

ffmpeg has recently added support for directshow filters which now allows one to capture the screen and stream and/or save it. Here is how you can do this:
1.) Grab a copy of the Screen Capture DirectShow source filter from Unreal Streaming Technologies. It’s about half way down that page. They have both the UScreenCapture X86 Edition and the X64 Edition (depending on your OS installation). I used the 64 bit filter on a Windows 7 64 bit installation.
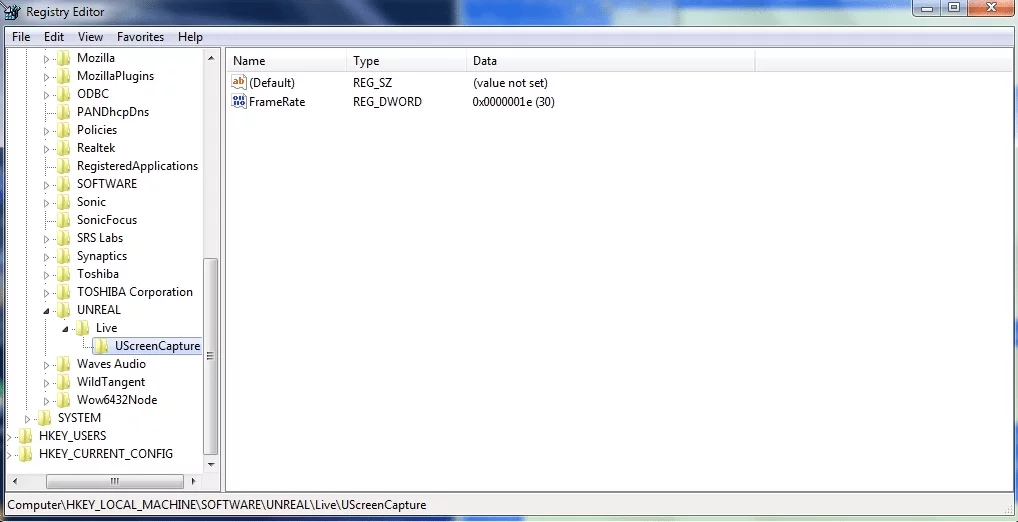
2.) Install the filter and make sure you make the following changes to your windows registry using regedit. The default frame rate for UScreenCapture filter is 10 f/s and we need to boost this to 30 frames/sec. You need to find the key HKLM\SOFTWARE\UNREAL\Live\UScreenCapture and insert a DWORD value of 30 for FrameRate (You have to create FrameRate, it does not exist by default). Once you’ve done the registry tweak, reboot.
3.) Install the latest greatest version of ffmpeg for your windows version from Zeranoe. I grabbed the 64 bit Static build since I didn’t want to deal with libraries and such. Extract it and stick it somewhere on your hard drive. Remember the path to this folder since we will need it later.
4.) Open a command line window and cd to the directory where you extracted ffmpeg into, find the bin directory and cd into it. This is were the ffmpeg executable resides. In my case (I extracted the ffmpeg files into “Program Files” directory) it is C:\Program Files\ffmpeg-git-059707e-win64-static\bin.
5.) If you’ve made it this far, hand in there, we’re almost home. Now you need to issue the command that gets the screen streaming going. But first we need to find out the name of the Screen filter device. So issue the following command:
ffmpeg -list_devices true -f dshow -i dummyIn the output look for a device called “UScreenCapture“. Hopefully if everything is working with the directshow filter you have a entry in the list. That’s the name of our device that we need to pass onto ffmpeg. While you’re there also look for your audio device entry as well. Mine was the truncated word “Stereo Mix (Realtek High Defini” (Yes mine was missing the end of that line). Jot that down somewhere as well. I will show you how to get audio going as well.
6.) So first step is to get video going. Assuming you have a “UScreenCapture” device (You could use another directshow filter if you like, this will work with most of them. I just used the Unreal filter for the heck of it), here is the command to start encoding and sending video:
ffmpeg -f dshow -i video="UScreenCapture" -r 30 -vcodec mpeg4 -q 12 -f mpegts udp://aaa.bbb.ccc.ddd:6666?pkt_size=188?buffer_size=65535- -f dshow specifies that you’re going to be using a directshow device as your input.
- -i video=”UScreenCapture” is the name of the input directshow device which we picked up in step 5.
- -r 30 is the frame rate.
- -vcodec mpeg4 is our video codec of choice.
- -q 12 is a quality measure for the encoding process (1 is the best and 30 the worst). We’re doing VBR encoding so this measures the compression ratio vs. picture quality.
- -f mpegts is our output filetype. In this case mpeg-2 transport stream. Yes, we’re encapsulating mpeg4 video inside a mpeg-2 transport stream…..why?….google it.
- udp://aaa.bbb.ccc.ddd:6666?pkt_size=188?buffer_size=65535 this last bit specifies the address and port number of the recipient machine (aaa.bbb.ccc.ddd is the ip address of that machine and 6666 is my arbitrary port number). We’re also instructing ffmpeg to create smaller 188 byte size udp packets (which is the size of the transport stream packets) to decrease latency and our buffer size is 64kb.
7.) On the receiving machine you should be able to use vlc, ffmpeg or mplayer to catch the stream. In vlc simply open the Network stream rtp://@:6666 , in ffmpeg you can use the command ffplay -i udp://:6666 or using mplayer you can issue the command mplayer -framedrop -double udp://:6666 .
8.) Now to optionally add sound to the whole thing we can use this command on the encoding machine (instead of step 6). You need to know the device name for your sound card and you probably want to turn the volume down (at least initially) on the decoding machine.
ffmpeg -f dshow -i video="UScreenCapture" -f dshow -i audio="Stereo Mix (Realtek High Definition)" -r 30 -vcodec mpeg4 -q 20 -acodec libmp3lame -ab 128k -f mpegts udp://141.117.224.74:6666?pkt_size=188?buffer_size=65535- -f dshow specifies that you’re going to be using a directshow device as your input (VIDEO).
- -i video=”UScreenCapture” is the name of the input directshow video device which we picked up in step 5.
- -f dshow specifies that you’re going to be using a directshow device as your input (AUDIO).
- -i audio=”Stereo Mix (Realtek High Defini” is the name of the input directshow audio device which we picked up in step 5.
- -r 30 is the frame rate.
- -vcodec mpeg4 is our video codec of choice.
- -q 20 is a quality measure for the encoding process (1 is the best and 30 the worst). We’re doing VBR encoding so this measures the compression ratio vs. picture quality. I went with 20 instead of 12 from step 6 since the audio encoding slows the machine down a bit.
- -acodec libmp3lame is our video codec of choice
- -f mpegts is our output filetype. In this case mpeg-2 transport stream. Yes, we’re encapsulating mpeg4 video inside a mpeg-2 transport stream…..why?….google it.
- udp://aaa.bbb.ccc.ddd:6666?pkt_size=188?buffer_size=65535 this last bit specifies the address and port number of the recipient machine (aaa.bbb.ccc.ddd is the ip address of that machine and 6666 is my arbitrary port number). We’re also instructing ffmpeg to create smaller 188 byte size udp packets (which is the size of the transport stream packets) to decrease latency and our buffer size is 64kb.
Source: nerdlogger.com
Streaming Desktop using FFMPEG in windows
- Download FFmpeg. Either 64-bit or 32-bit should work.
- Install Screen Capturer Recorder. The installer should automatically install Microsoft Visual C++ Redistributable as well, if needed.
- Useffmpeg -f dshow -i video=screen-capture-recorder -r 24000/1001 -q 1 out.avi
Code Streaming Desktop using FFMPEG in windows to facebook
ffmpeg -f dshow -i video=”UScreenCapture” -f dshow -i audio=”Microphone (2- High Definition Audio Device)” -s 1280×720 -acodec libmp3lame -ar 44100 -b:a 128k -pix_fmt yuv420p -profile:v baseline -bufsize 6000k -vb 400k -maxrate 1500k -deinterlace -vcodec libx264 -preset veryfast -q 20 -g 30 -r 30 -f flv “rtmps://live-api-s.facebook.com:443/rtmp/zzzz”