

| We identified OpenFaceSwap as being the best deepfake tool currently available (07/05/2018). OpenFaceSwap is a GUI layer over a high performing python script it is free, open source and people at deepfakes.club really like it. The following is a quick tutorial on how to make your first Deepfake using OpenFaceSwap. |
Installing OpenFaceSwap
- Download OpenFaceSwap v9.0 (Mega.nz) (Link)
- Choose install directory that is NOT in Program Files (due to possible user permission errors). The default is set to “C:\OpenFaceSwap”.
- Download and install Microsoft Visual Studio Redistributable 2015 (Link)
- Download and install CUDA 9.0, NOT 9.1 (Link)
- Download and install cuDNN 7.05 for CUDA 9.0, NOT 7.1, (Link, requires email registration)
- 7.05 is located in the archive
- In order to install cuDNN, read the installation guide
- Download and install Latest NVIDIA graphics card drivers (Link)
Using OpenFaceSwap (Making the Deepfake)
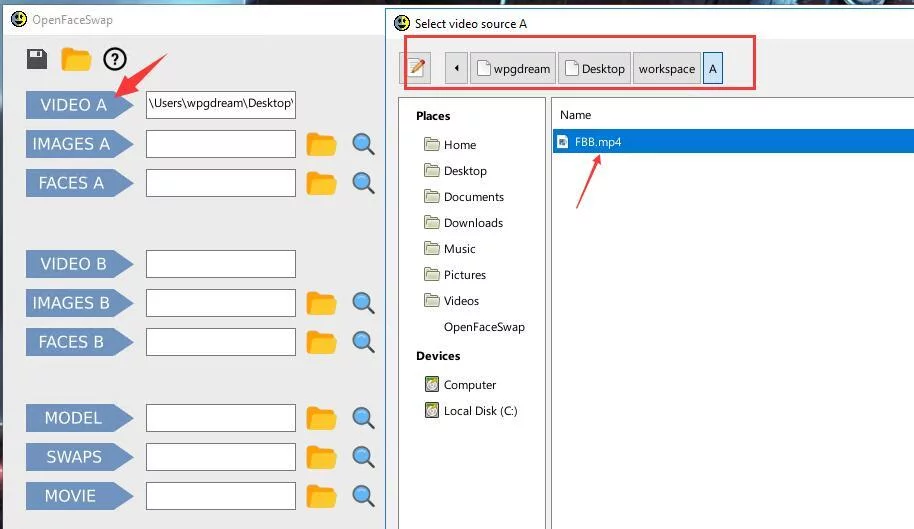
| 1. Click Video A to specify the video where you want to swap the face (This is the source ) | |
| 2. Click Images A to extract all of the frames from Video A. When done, hit any key at the prompt to continue. If you like, you can press the magnifying glass icon next to the directory name to inspect the results. | |
| 3. Click Faces A to extract all of the faces from Images A. Ideally, your video only has one face present. You may wish to inspect your results and remove any erroneous face extractions. | |
| 4. Repeat the above three steps with Video B, which is the face that you will insert. (If you have a set of images instead of a video, you can instead skip ahead to the Images B text box. Click the folder icon to select the directory that has all of your images. Then, proceed to click the Faces B button as before.) | |
| 5. Click Model. When you hover over the button, the necessary input folders will be highlighted. In this case, those are folders for Faces A and Faces B. Training your model will take many hours. You can wait until the printed loss values are less than 0.02. Also, check the previews for the quality of the faceswap. | |
| 6. When ready, press the Enter key to stop training. | |
| 7. Click Swaps to apply your model to turn face A into face B. If you hover over the button, you will see that you need input folders for Faces A and Model. When this is finished, you may wish to inspect your results as before. | |
| 8. Finally, click Movie to generate movie file. Your movie file will be named as shown in the text box and be placed within your OpenFaceSwap installation directory. Click the magnifying glass to open up the folder and play the movie file. |
When you are done, you may wish to click the Trash icon and empty your default folders. If you want to delete your model files, you can also do that by checking the appropriate box.
Advanced Options
Click the gear icon next to each command to see a number of options.
Not all command line options are available from the GUI. You can enter custom commands by checking the “Custom” box. You may wish to highlight and copy the original commands first and then edit them.
You can save and load all of your settings, including your custom commands, using the icons in the upper left corner.
The GUI shell runs using python backends or “engines”. The default engine in the installation is an exact copy of the most recent faceswap GitHub repository. To load the experimental or low memory faceswap packages, edit the openfaceswapconfig.txt file to point to the appropriate paths. This will normally only involve inserting a “_exp” or “_lowmem” in the appropriate paths.
Note that you can mix and match different extraction and conversion scripts from different packages in the engine configuration file, although there could be unforseen compatibility issues.
Some notes on the engines:
- DFaker only works in the experimental engine.
- The Original model uses loss balancing in the experimental engine with a minimum training ratio of 1:4 (see the code).
- The LowMem model in the low memory engine should work for 2GB graphics cards. The extraction uses face_recognition instead of face-alignment, so the results will be slightly different. This can be useful if you are having errors with one extraction module. Note that the alignments.json files in the experimental engine have a slightly different format.
The portable Winpython package is a complete and independent no-install platform. If you wish to use the python package, run the “WinPython Command Prompt.exe” prompt from the “python” directory. This will setup the proper environment and let you use commands such as “python faceswap.py” from the CLI.
Read more: https://www.deepfakescn.com/?p=414